Medportal Documentation
Help system
How do administrators print a paper copy of an assessment for a student to write?
For more information about printing paper copies of assessments, head to
https://examsoft.force.com/emcommunity/s/article/Legacy-Portal-Exporting-Assessments
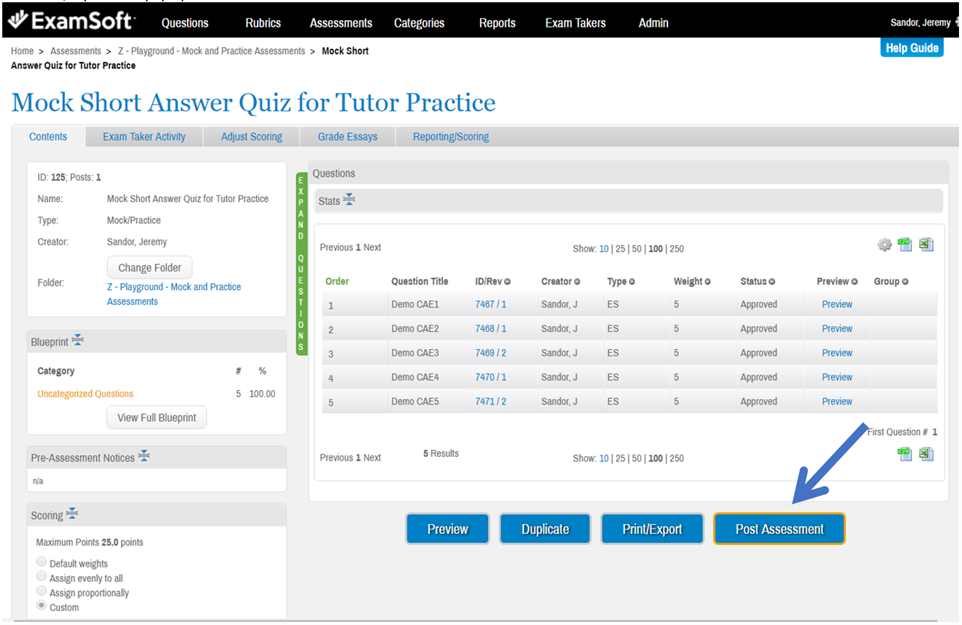
1. To print a paper copy of an assessment, navigate to the assessment in question and click on the blue “Print/Export” button. A window entitled “Print/Export” will pop up.
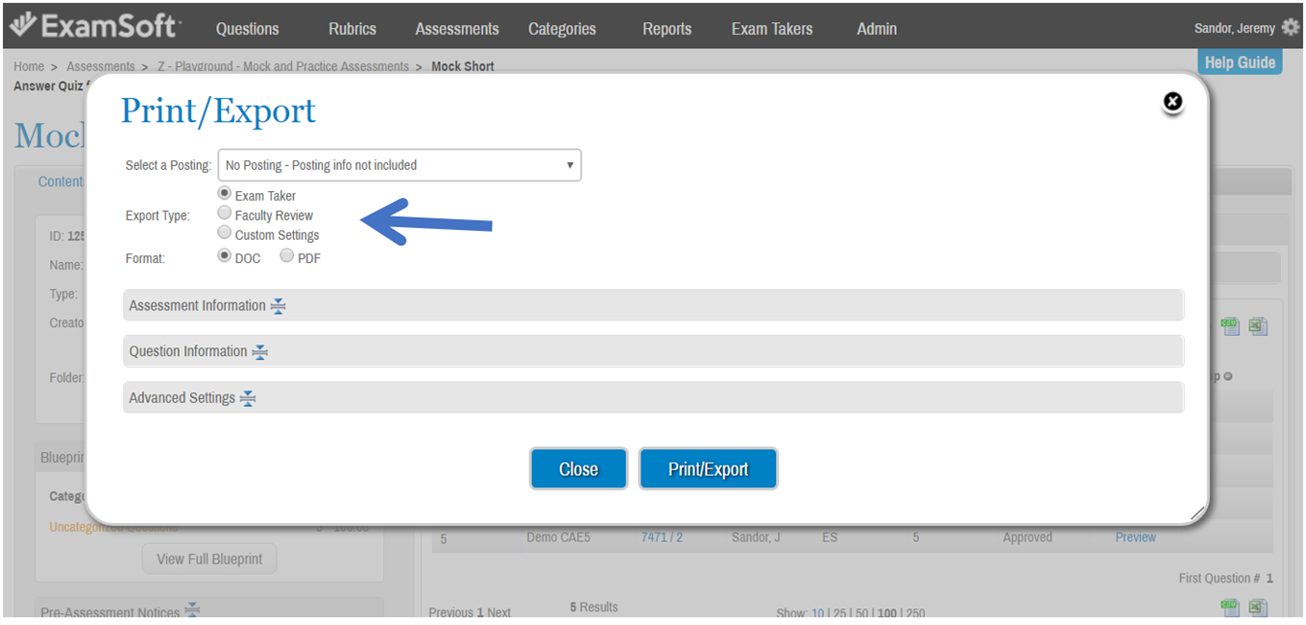
2. Use the options in the “Print/Export” window to tailor the export file that you would like to create.
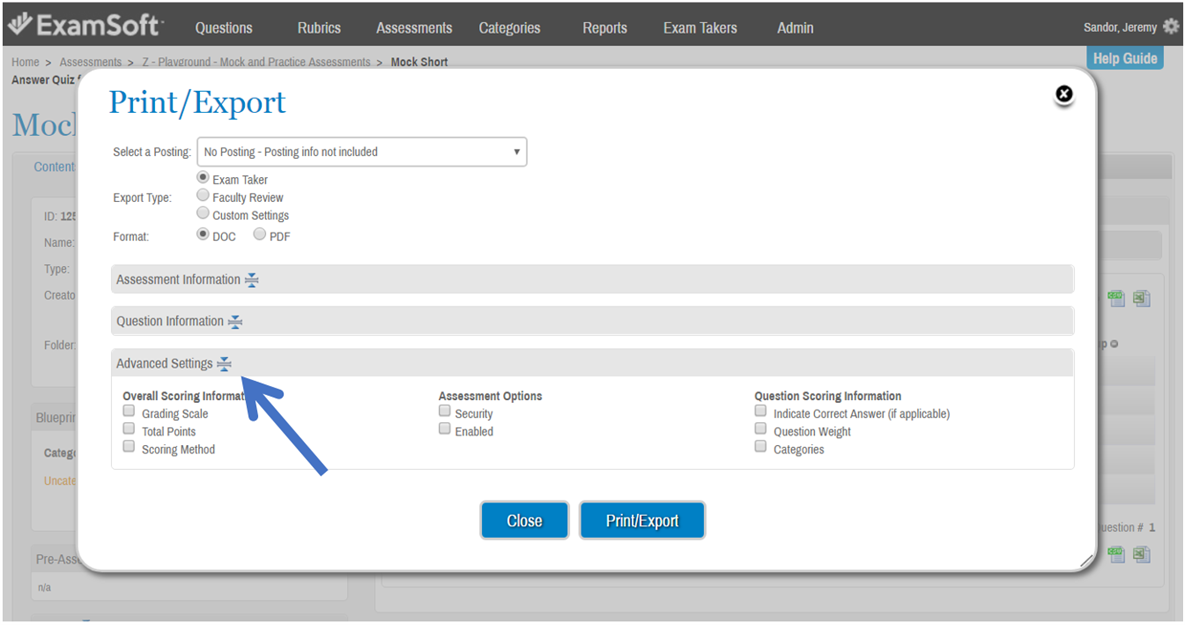
Typically, for Select a Posting, you should select “No Posting – Posting info not included”.
For Export Type, select “Exam Taker”, and for Format, select “DOC”
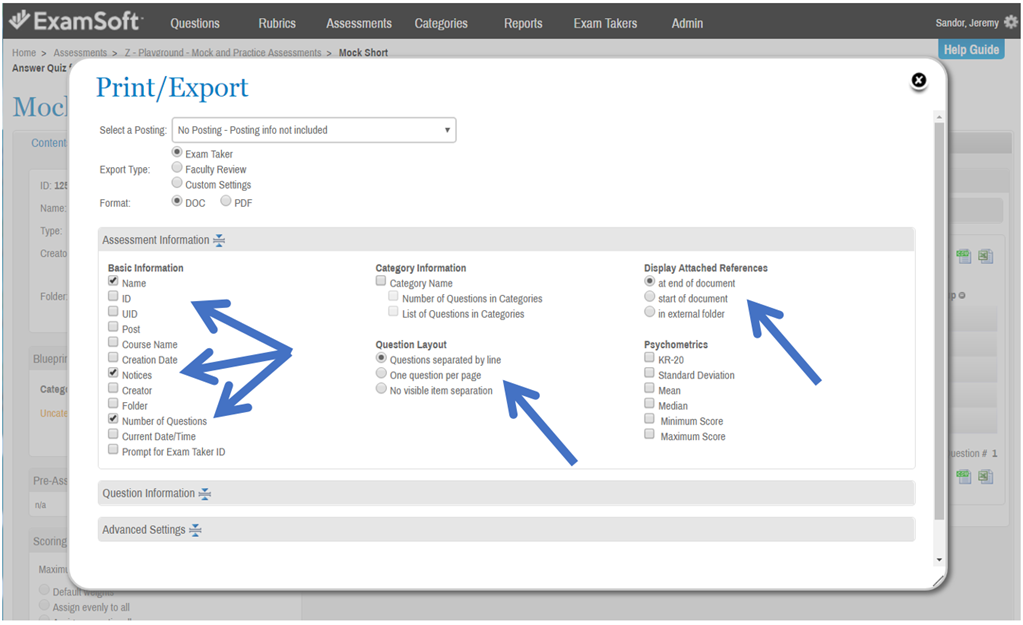
3. In the “Assessment Information” section, typically you need only have a checkmark beside “Name”, “Notices”, and “Number of Questions”.
For Question Layout, select “Questions separated by line”, and for Display Attached References, select “At end of document”.
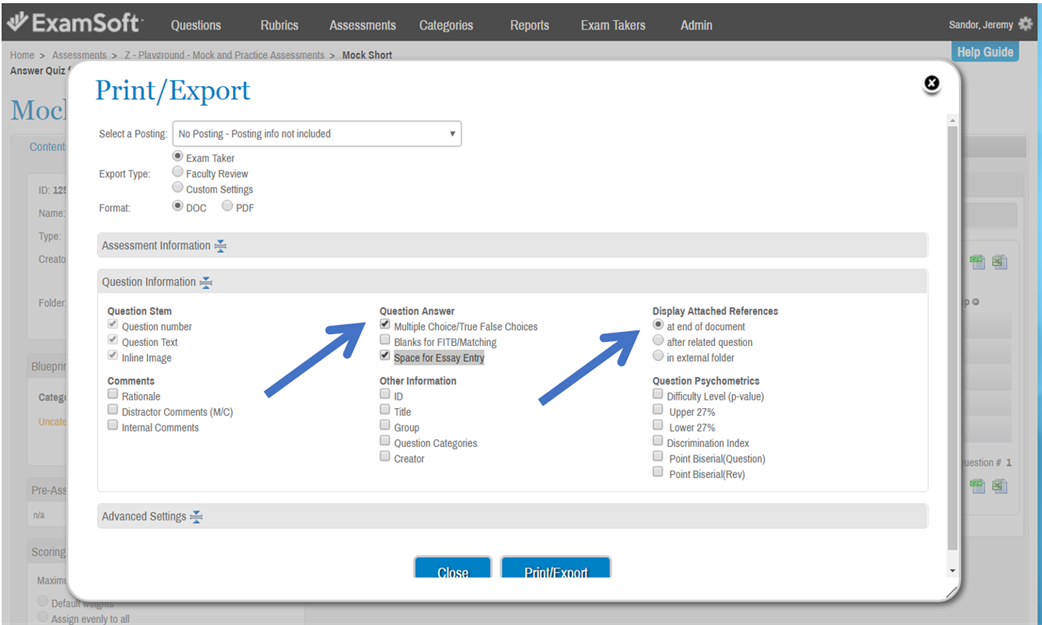
4. In the “Question Information” section, typically you need only have a checkmark beside “Multiple Choice/True False Choices” and “Space for Essay Entry”.
For Display Attached References, select “At end of document”.
5. In the “Advanced Settings” section, typically you leave all boxes unchecked.
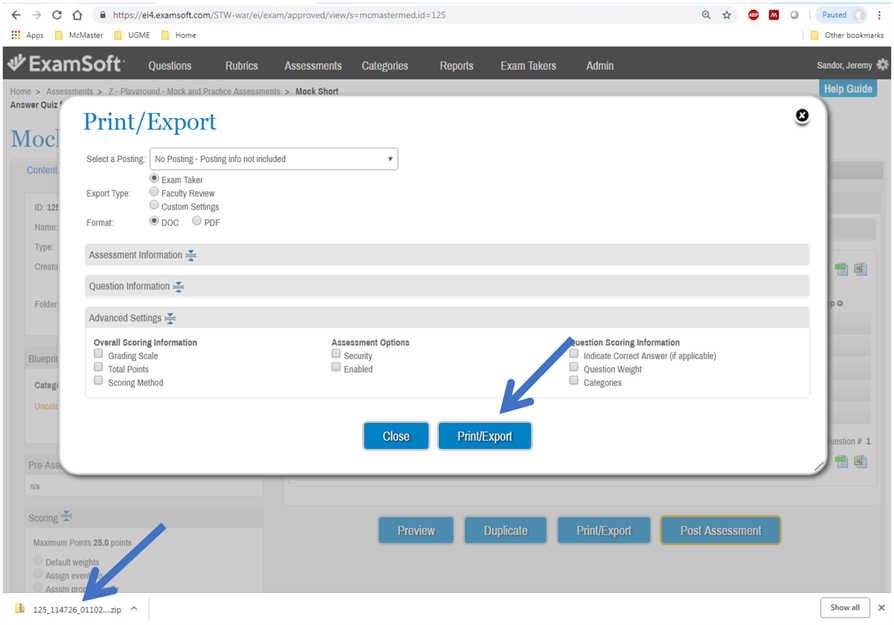
6. Once you are satisfied with your settings, click the blue Print/Export button. A compressed file will download to your computer.
You can close the “Print/Export” window and open the downloaded file to access, edit, and print the copy of the assessment.
Featured Solutions
How do administrators print a paper copy of an assessment for a student to write?
For more information about printing paper copies of assessments, head to
https://examsoft.force.com/emcommunity/s/article/Legacy-Portal-Exporting-Assessments
1. To print a paper copy of an assessment, navigate to the assessment in question and click on the blue “Print/Export” button. A window entitled “Print/Export” will pop up.
2. Use the options in the “Print/Export” window to tailor the export file that you would like to create.
Typically, for Select a Posting, you should select “No Posting – Posting info not included”.
For Export Type, select “Exam Taker”, and for Format, select “DOC”
3. In the “Assessment Information” section, typically you need only have a checkmark beside “Name”, “Notices”, and “Number of Questions”.
For Question Layout, select “Questions separated by line”, and for Display Attached References, select “At end of document”.
4. In the “Question Information” section, typically you need only have a checkmark beside “Multiple Choice/True False Choices” and “Space for Essay Entry”.
For Display Attached References, select “At end of document”.
5. In the “Advanced Settings” section, typically you leave all boxes unchecked.
6. Once you are satisfied with your settings, click the blue Print/Export button. A compressed file will download to your computer.
You can close the “Print/Export” window and open the downloaded file to access, edit, and print the copy of the assessment.
Frequently Asked
How do administrators print a paper copy of an assessment for a student to write?
For more information about printing paper copies of assessments, head to
https://examsoft.force.com/emcommunity/s/article/Legacy-Portal-Exporting-Assessments
1. To print a paper copy of an assessment, navigate to the assessment in question and click on the blue “Print/Export” button. A window entitled “Print/Export” will pop up.
2. Use the options in the “Print/Export” window to tailor the export file that you would like to create.
Typically, for Select a Posting, you should select “No Posting – Posting info not included”.
For Export Type, select “Exam Taker”, and for Format, select “DOC”
3. In the “Assessment Information” section, typically you need only have a checkmark beside “Name”, “Notices”, and “Number of Questions”.
For Question Layout, select “Questions separated by line”, and for Display Attached References, select “At end of document”.
4. In the “Question Information” section, typically you need only have a checkmark beside “Multiple Choice/True False Choices” and “Space for Essay Entry”.
For Display Attached References, select “At end of document”.
5. In the “Advanced Settings” section, typically you leave all boxes unchecked.
6. Once you are satisfied with your settings, click the blue Print/Export button. A compressed file will download to your computer.
You can close the “Print/Export” window and open the downloaded file to access, edit, and print the copy of the assessment.
Latest
How do administrators print a paper copy of an assessment for a student to write?
For more information about printing paper copies of assessments, head to
https://examsoft.force.com/emcommunity/s/article/Legacy-Portal-Exporting-Assessments
1. To print a paper copy of an assessment, navigate to the assessment in question and click on the blue “Print/Export” button. A window entitled “Print/Export” will pop up.
2. Use the options in the “Print/Export” window to tailor the export file that you would like to create.
Typically, for Select a Posting, you should select “No Posting – Posting info not included”.
For Export Type, select “Exam Taker”, and for Format, select “DOC”
3. In the “Assessment Information” section, typically you need only have a checkmark beside “Name”, “Notices”, and “Number of Questions”.
For Question Layout, select “Questions separated by line”, and for Display Attached References, select “At end of document”.
4. In the “Question Information” section, typically you need only have a checkmark beside “Multiple Choice/True False Choices” and “Space for Essay Entry”.
For Display Attached References, select “At end of document”.
5. In the “Advanced Settings” section, typically you leave all boxes unchecked.
6. Once you are satisfied with your settings, click the blue Print/Export button. A compressed file will download to your computer.
You can close the “Print/Export” window and open the downloaded file to access, edit, and print the copy of the assessment.