Medportal Documentation
Help system
How do administrators assign faculty to grade CAEs or PIEs?
1. To assign faculty to grade a question item,
Navigate to the assessment's "Grade Essays" tab and click the “Manage Settings / Grade” button for the question item to which you want to assign faculty members.
PAUSE & CHECK: If you cannot see the title for a grading rubric, do not proceed with assigning graders!
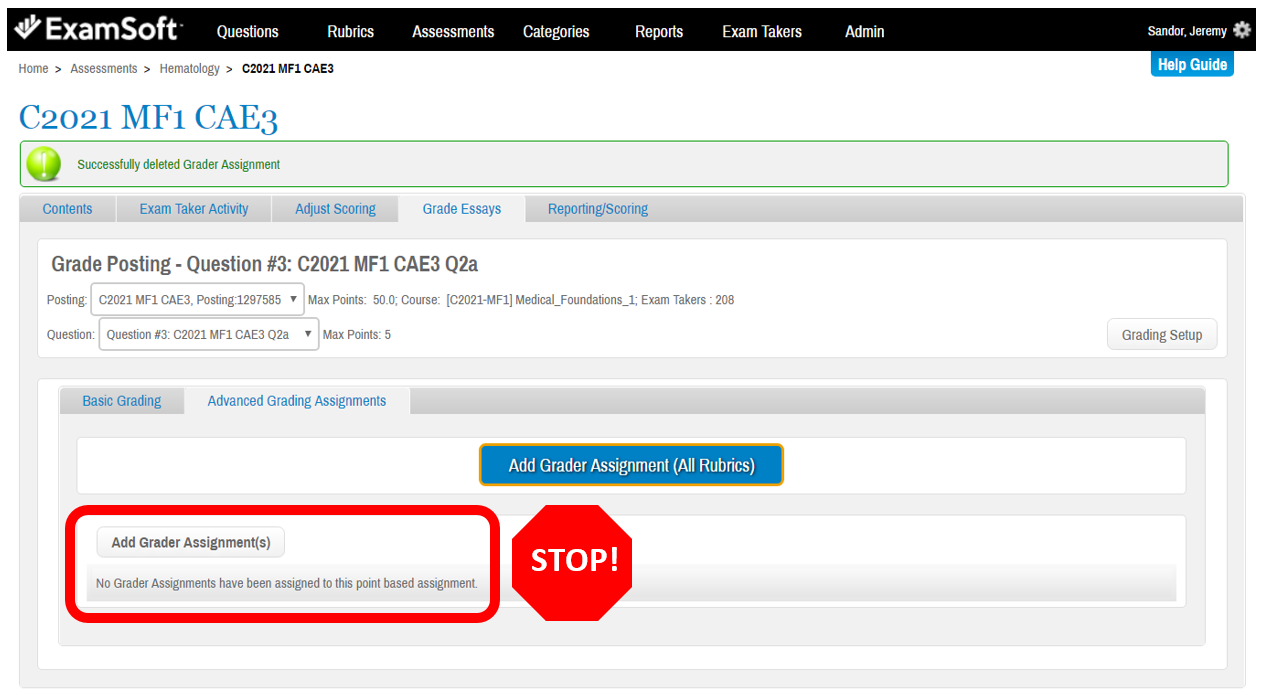
2. If you can see the title for a grading rubric, proceed with assigning graders.
Click on the posting drop-down menu to select the assessment corresponding to your campus. This ensures you will assign students from your campus to faculty from your campus.
Then click on the grey “Add Grader Assignment(s)” to bring up the “Manage Graders” window.
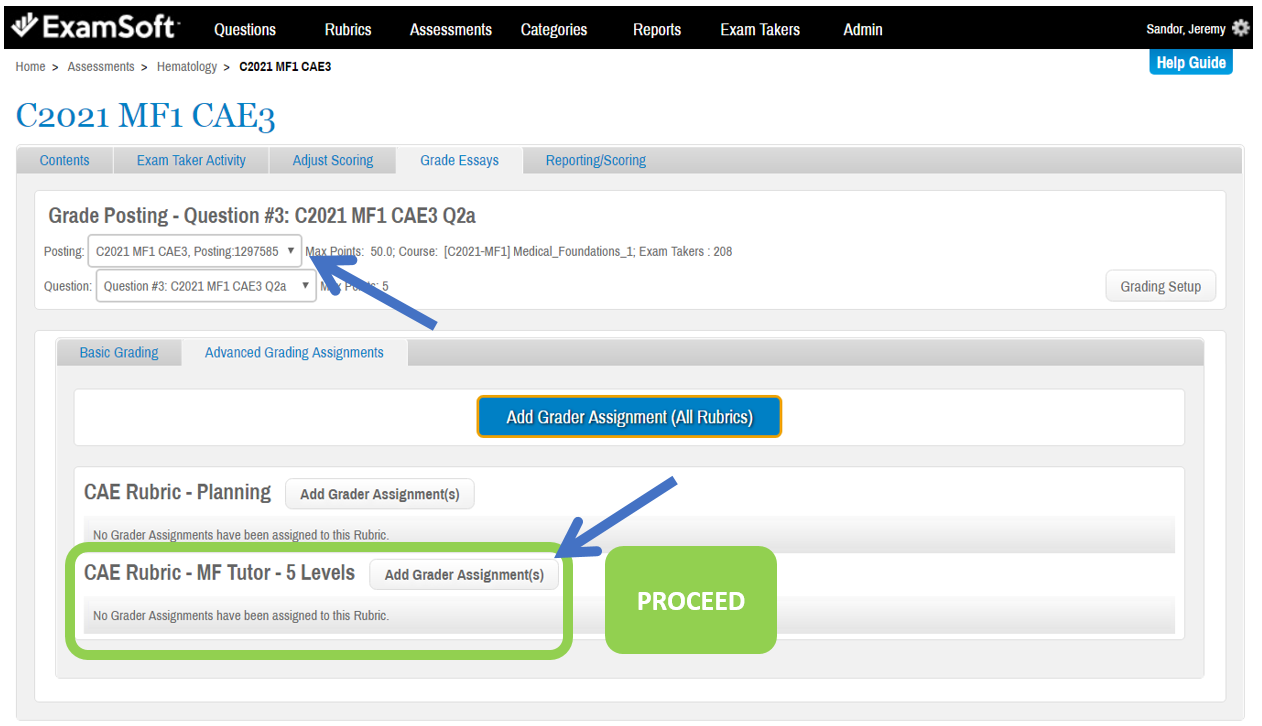
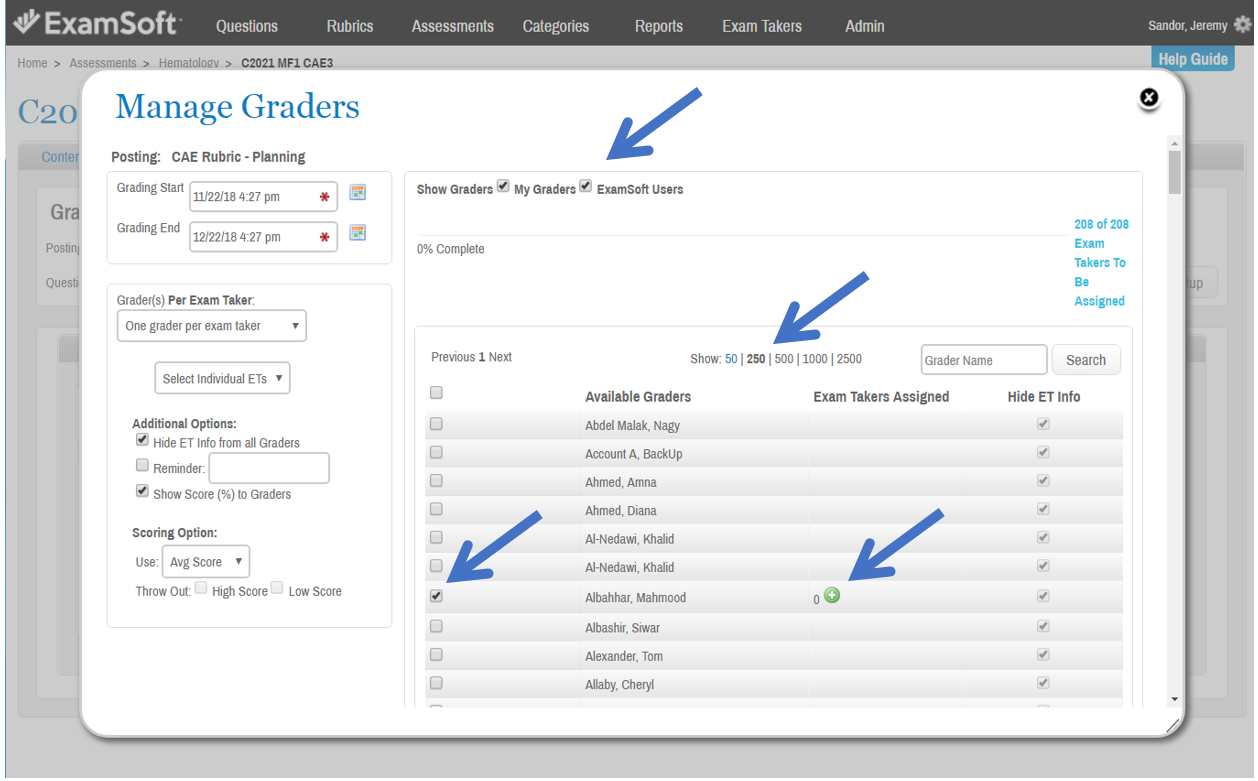
3. In the “Manage Graders” window, start the grader assignment by setting the time period tutors have to grade student responses.
Click the calendar beside “Grading Start” to set the time when faculty can begin to grade student responses. (Typically this is in the late morning the day that students write an assessment, but confirm with Curriculum Assistants at the other campuses to be consistent)
Click the calendar beside “Grading End” to set the deadline by which faculty should finish grading student responses. (Typically this is seven days after students write an assessment, but confirm with the Curriculum Coordinator)
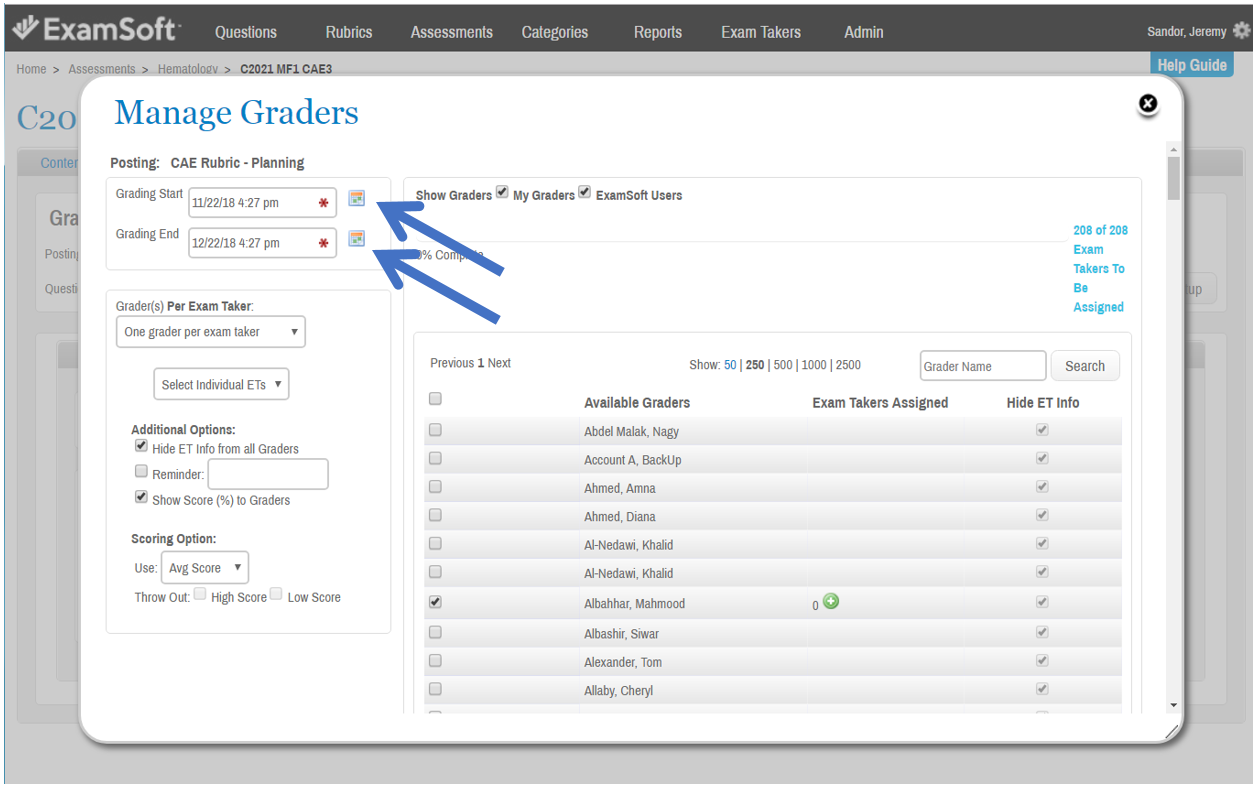
4. Continuing in the “Manage Graders” window, set the grading parameters in the left-hand column.
Leave the “Grader(s) Per Exam Taker” menu as-is: “One grader per exam taker”
Change the “Randomly Assign ETs” drop-down option to “Select Individual ETs”
Ensure a checkmark beside “Hide ET info from all Graders”
Ensure no checkmark beside “Reminder”
Ensure a checkmark beside “Show Score (%) to Graders”
Leave all “Scoring Options” as-is
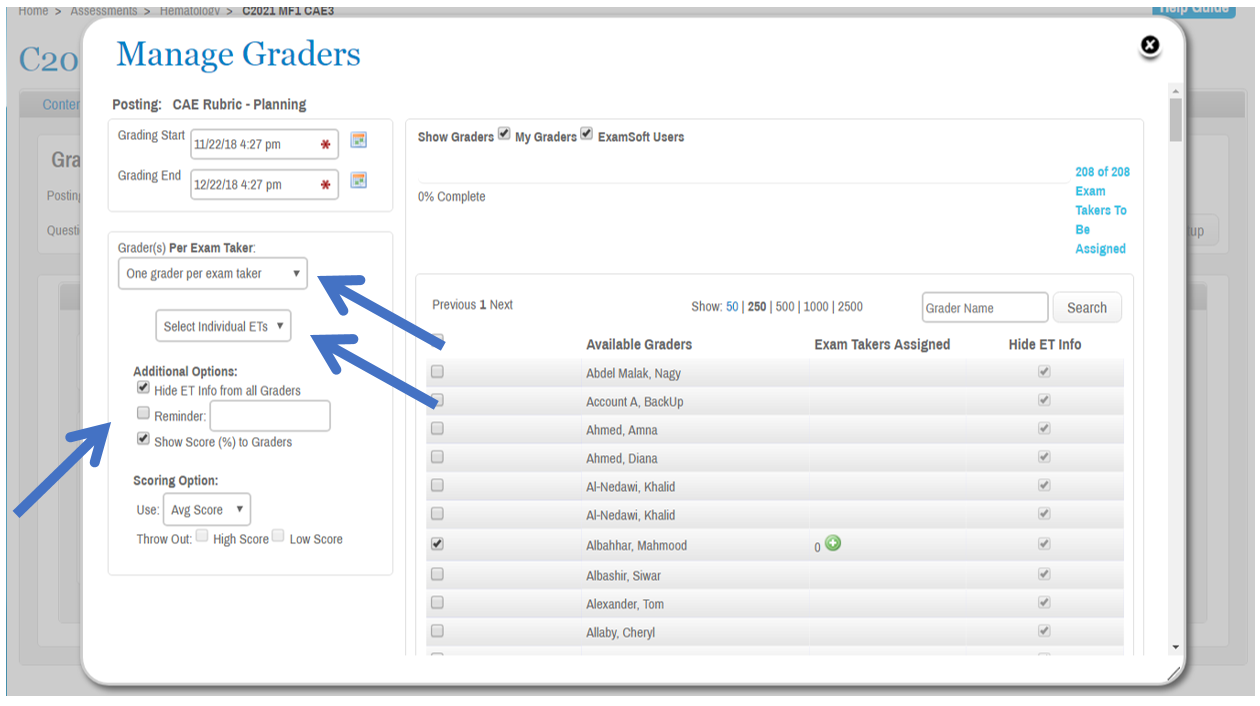
5. Continuing in the “Manage Graders” window, assign students to faculty.
Ensure a checkmark beside “ExamSoft Users” and click on the highest available number of names to show (250 or 500)
Find the faculty member to whom you want assign student responses, and select this individual by putting a checkmark beside this person’s name.
Click on the green-and-white “+” icon that appears to add students.
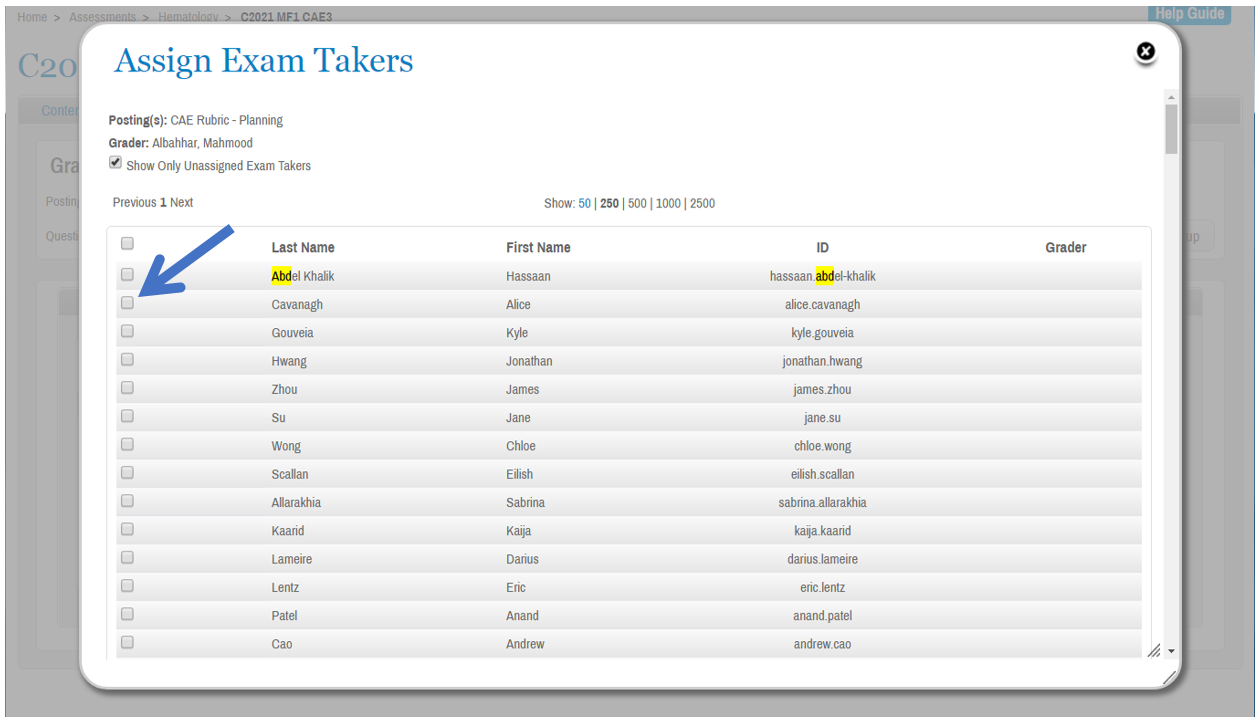
6. In the “Assign Exam Takers” window that appears, find the students that you want to be graded by the tutor you have selected.
Select these students by putting a checkmark beside their respective names.
When you are finished assigning students to a tutor, scroll to the bottom of the “Assign Exam Takers” window and click the blue “Save” button to save your work and go back to the list of tutors.
Repeat steps 5 and 6 for each faculty member to whom you are assigning students. When you have assigned students to all faculty members grading this question item, scroll to the bottom of the list of faculty on the “Manage Graders” window, and click the blue “Save” button.
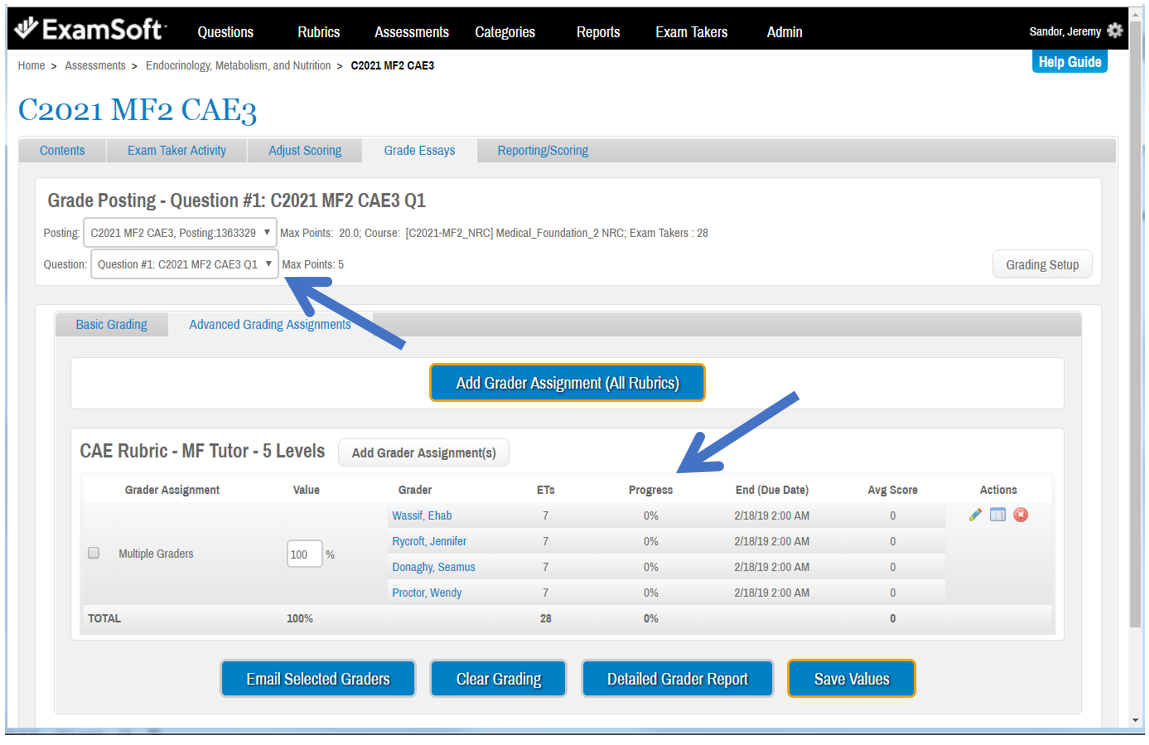
7. You will now be able to see the list of faculty members that have been assigned to grade this question item from the assessment.
Under the “Progress” column, you can see what proportion of responses that each faculty member has successfully graded. You can monitor grader’s progress during the week that they have to mark the CAE or PIE.
To assign graders to the next question in the assessment, click on the “Question” drop-down menu to select the next question in the assessment.
Then repeat steps 2 through 6 for that question item and all subsequent question items.
Featured Solutions
How do administrators assign faculty to grade CAEs or PIEs?
1. To assign faculty to grade a question item,
Navigate to the assessment's "Grade Essays" tab and click the “Manage Settings / Grade” button for the question item to which you want to assign faculty members.
PAUSE & CHECK: If you cannot see the title for a grading rubric, do not proceed with assigning graders!

2. If you can see the title for a grading rubric, proceed with assigning graders.
Click on the posting drop-down menu to select the assessment corresponding to your campus. This ensures you will assign students from your campus to faculty from your campus.
Then click on the grey “Add Grader Assignment(s)” to bring up the “Manage Graders” window.

3. In the “Manage Graders” window, start the grader assignment by setting the time period tutors have to grade student responses.
Click the calendar beside “Grading Start” to set the time when faculty can begin to grade student responses. (Typically this is in the late morning the day that students write an assessment, but confirm with Curriculum Assistants at the other campuses to be consistent)
Click the calendar beside “Grading End” to set the deadline by which faculty should finish grading student responses. (Typically this is seven days after students write an assessment, but confirm with the Curriculum Coordinator)

4. Continuing in the “Manage Graders” window, set the grading parameters in the left-hand column.
Leave the “Grader(s) Per Exam Taker” menu as-is: “One grader per exam taker”
Change the “Randomly Assign ETs” drop-down option to “Select Individual ETs”
Ensure a checkmark beside “Hide ET info from all Graders”
Ensure no checkmark beside “Reminder”
Ensure a checkmark beside “Show Score (%) to Graders”
Leave all “Scoring Options” as-is

5. Continuing in the “Manage Graders” window, assign students to faculty.
Ensure a checkmark beside “ExamSoft Users” and click on the highest available number of names to show (250 or 500)
Find the faculty member to whom you want assign student responses, and select this individual by putting a checkmark beside this person’s name.
Click on the green-and-white “+” icon that appears to add students.

6. In the “Assign Exam Takers” window that appears, find the students that you want to be graded by the tutor you have selected.
Select these students by putting a checkmark beside their respective names.
When you are finished assigning students to a tutor, scroll to the bottom of the “Assign Exam Takers” window and click the blue “Save” button to save your work and go back to the list of tutors.
Repeat steps 5 and 6 for each faculty member to whom you are assigning students. When you have assigned students to all faculty members grading this question item, scroll to the bottom of the list of faculty on the “Manage Graders” window, and click the blue “Save” button.

7. You will now be able to see the list of faculty members that have been assigned to grade this question item from the assessment.
Under the “Progress” column, you can see what proportion of responses that each faculty member has successfully graded. You can monitor grader’s progress during the week that they have to mark the CAE or PIE.
To assign graders to the next question in the assessment, click on the “Question” drop-down menu to select the next question in the assessment.
Then repeat steps 2 through 6 for that question item and all subsequent question items.

Frequently Asked
How do administrators assign faculty to grade CAEs or PIEs?
1. To assign faculty to grade a question item,
Navigate to the assessment's "Grade Essays" tab and click the “Manage Settings / Grade” button for the question item to which you want to assign faculty members.
PAUSE & CHECK: If you cannot see the title for a grading rubric, do not proceed with assigning graders!

2. If you can see the title for a grading rubric, proceed with assigning graders.
Click on the posting drop-down menu to select the assessment corresponding to your campus. This ensures you will assign students from your campus to faculty from your campus.
Then click on the grey “Add Grader Assignment(s)” to bring up the “Manage Graders” window.

3. In the “Manage Graders” window, start the grader assignment by setting the time period tutors have to grade student responses.
Click the calendar beside “Grading Start” to set the time when faculty can begin to grade student responses. (Typically this is in the late morning the day that students write an assessment, but confirm with Curriculum Assistants at the other campuses to be consistent)
Click the calendar beside “Grading End” to set the deadline by which faculty should finish grading student responses. (Typically this is seven days after students write an assessment, but confirm with the Curriculum Coordinator)

4. Continuing in the “Manage Graders” window, set the grading parameters in the left-hand column.
Leave the “Grader(s) Per Exam Taker” menu as-is: “One grader per exam taker”
Change the “Randomly Assign ETs” drop-down option to “Select Individual ETs”
Ensure a checkmark beside “Hide ET info from all Graders”
Ensure no checkmark beside “Reminder”
Ensure a checkmark beside “Show Score (%) to Graders”
Leave all “Scoring Options” as-is

5. Continuing in the “Manage Graders” window, assign students to faculty.
Ensure a checkmark beside “ExamSoft Users” and click on the highest available number of names to show (250 or 500)
Find the faculty member to whom you want assign student responses, and select this individual by putting a checkmark beside this person’s name.
Click on the green-and-white “+” icon that appears to add students.

6. In the “Assign Exam Takers” window that appears, find the students that you want to be graded by the tutor you have selected.
Select these students by putting a checkmark beside their respective names.
When you are finished assigning students to a tutor, scroll to the bottom of the “Assign Exam Takers” window and click the blue “Save” button to save your work and go back to the list of tutors.
Repeat steps 5 and 6 for each faculty member to whom you are assigning students. When you have assigned students to all faculty members grading this question item, scroll to the bottom of the list of faculty on the “Manage Graders” window, and click the blue “Save” button.

7. You will now be able to see the list of faculty members that have been assigned to grade this question item from the assessment.
Under the “Progress” column, you can see what proportion of responses that each faculty member has successfully graded. You can monitor grader’s progress during the week that they have to mark the CAE or PIE.
To assign graders to the next question in the assessment, click on the “Question” drop-down menu to select the next question in the assessment.
Then repeat steps 2 through 6 for that question item and all subsequent question items.

Latest
How do administrators assign faculty to grade CAEs or PIEs?
1. To assign faculty to grade a question item,
Navigate to the assessment's "Grade Essays" tab and click the “Manage Settings / Grade” button for the question item to which you want to assign faculty members.
PAUSE & CHECK: If you cannot see the title for a grading rubric, do not proceed with assigning graders!

2. If you can see the title for a grading rubric, proceed with assigning graders.
Click on the posting drop-down menu to select the assessment corresponding to your campus. This ensures you will assign students from your campus to faculty from your campus.
Then click on the grey “Add Grader Assignment(s)” to bring up the “Manage Graders” window.

3. In the “Manage Graders” window, start the grader assignment by setting the time period tutors have to grade student responses.
Click the calendar beside “Grading Start” to set the time when faculty can begin to grade student responses. (Typically this is in the late morning the day that students write an assessment, but confirm with Curriculum Assistants at the other campuses to be consistent)
Click the calendar beside “Grading End” to set the deadline by which faculty should finish grading student responses. (Typically this is seven days after students write an assessment, but confirm with the Curriculum Coordinator)

4. Continuing in the “Manage Graders” window, set the grading parameters in the left-hand column.
Leave the “Grader(s) Per Exam Taker” menu as-is: “One grader per exam taker”
Change the “Randomly Assign ETs” drop-down option to “Select Individual ETs”
Ensure a checkmark beside “Hide ET info from all Graders”
Ensure no checkmark beside “Reminder”
Ensure a checkmark beside “Show Score (%) to Graders”
Leave all “Scoring Options” as-is

5. Continuing in the “Manage Graders” window, assign students to faculty.
Ensure a checkmark beside “ExamSoft Users” and click on the highest available number of names to show (250 or 500)
Find the faculty member to whom you want assign student responses, and select this individual by putting a checkmark beside this person’s name.
Click on the green-and-white “+” icon that appears to add students.

6. In the “Assign Exam Takers” window that appears, find the students that you want to be graded by the tutor you have selected.
Select these students by putting a checkmark beside their respective names.
When you are finished assigning students to a tutor, scroll to the bottom of the “Assign Exam Takers” window and click the blue “Save” button to save your work and go back to the list of tutors.
Repeat steps 5 and 6 for each faculty member to whom you are assigning students. When you have assigned students to all faculty members grading this question item, scroll to the bottom of the list of faculty on the “Manage Graders” window, and click the blue “Save” button.

7. You will now be able to see the list of faculty members that have been assigned to grade this question item from the assessment.
Under the “Progress” column, you can see what proportion of responses that each faculty member has successfully graded. You can monitor grader’s progress during the week that they have to mark the CAE or PIE.
To assign graders to the next question in the assessment, click on the “Question” drop-down menu to select the next question in the assessment.
Then repeat steps 2 through 6 for that question item and all subsequent question items.
